
Family emergency drills prepare everyone in your household for disasters like fires, tornadoes, or blackouts. These hands-on practices help build confidence, reduce panic, and ensure everyone knows what to do when seconds count. Here's what you need to know:
- Why drills matter: Emergencies like house fires or tornadoes leave little time to think. Drills create muscle memory, so your family can act quickly and stay safe.
- Types of drills:
- Fire and nighttime evacuation
- Severe weather shelter-in-place
- Family evacuation (bug-out)
- Basic medical response
- Home security lockdown
- How to run drills: Simulate realistic scenarios, assign roles (like Incident Lead or Medical Lead), and practice regularly.
- Tools to support drills: Emergency kits, NOAA radios, flashlights, and go-bags are essential. Test and maintain them twice a year.
- Customizing for your family: Include children, seniors, pets, and even livestock in your plans. Adjust drills based on your home layout or regional risks.
Start small - schedule your first drill within 30 days. Practice, review, and improve as you go. With consistent effort, you’ll build a safer, more prepared household.
@figure 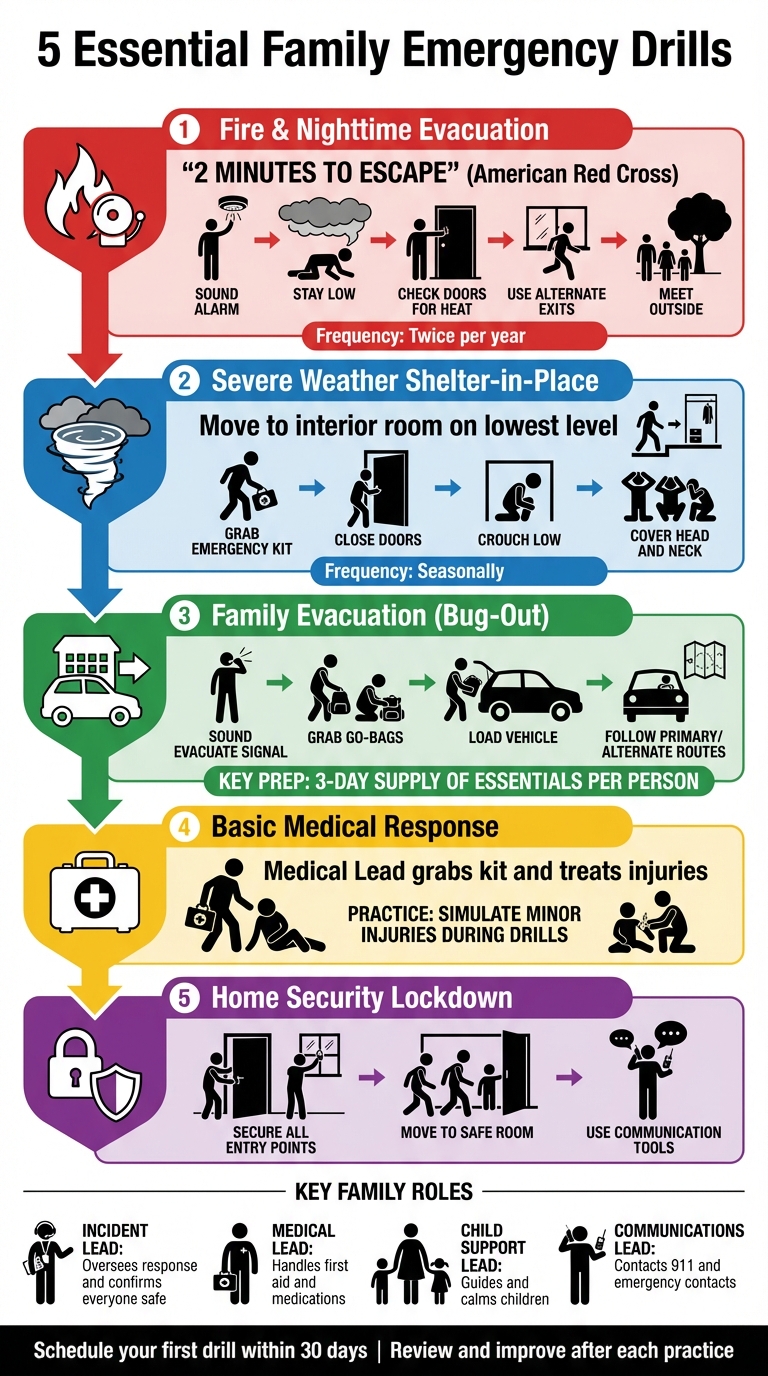 {5 Types of Family Emergency Drills and How to Run Them}
Basic Principles for Running Emergency Drills
How to Make Drills Realistic and Safe
Striking the right balance between realism and safety is key when conducting emergency drills. Start by setting a clear objective - like evacuating the house in under two minutes. Simulate realistic conditions by activating alarms, dimming lights to mimic nighttime, or blocking primary exits to encourage the use of alternate routes. However, avoid using real flames, smoke, or live weapons to ensure everyone's safety.
For fire drills, participants can practice checking doors for heat (without touching hot surfaces) and staying low to avoid imaginary smoke. Test escape routes, such as quick-release window bars, during daylight hours and under adult supervision. According to the New York State Division of Homeland Security, repeated practice leads to quicker and more effective actions in real emergencies. After each drill, hold a debriefing session to address any concerns or confusion. As your family gains confidence, you can gradually introduce more challenging scenarios. Assigning specific roles before the drill begins ensures a coordinated response.
Assigning Family Roles
Assigning clear roles during an emergency helps maintain order and reduces panic. Start by designating an Incident Lead, typically an adult, to oversee the response, make decisions, and confirm everyone has reached the meeting point. A Medical Lead can focus on grabbing the first-aid kit and attending to injuries or special needs, such as medications for elderly family members. Assign a Child Support Lead to guide younger children along escape routes and keep them calm. Meanwhile, a Communications Lead can handle contacting 911 or reaching out to your designated out-of-state emergency contact.
These roles ensure your family operates as a team during high-stress situations. This approach is supported by emergency plans from organizations like the Army and the Red Cross, which emphasize the importance of everyone knowing their responsibilities. Document these roles and display them prominently in your home. Practice these assignments during every drill so they become second nature. Before starting any drill, double-check that all safety measures are in place.
Safety Checks Before Starting Drills
A thorough safety check is essential before running any drill to keep participants safe while maintaining realism. Start by clearing all exits and ensuring windows and doors open easily. Remove any tripping hazards from hallways and stairways. Test smoke and carbon monoxide alarms to confirm they’re functioning properly. Identify safe zones, such as an outdoor meeting point like your mailbox for evacuations or an interior room for shelter-in-place scenarios.
Make sure no live weapons, flames, or active utilities are part of the drill. Don’t forget about pets - have leashes or carriers ready and assign someone to handle them. Keep the emergency plan visible and reinforce the importance of quick, decisive action. These precautions create a controlled environment where your family can practice safely and build confidence for real emergencies.
How to Run Common Emergency Drills
Fire and Nighttime Evacuation Drills
Start by drawing a floor plan of your home, marking every door, window, and potential exit. Try to identify two exits for each room - typically the main door and a backup like a window. Choose a single outdoor meeting spot, such as a tree, mailbox, or a neighbor's porch, that is far enough from the house to be safe.
Begin the drill with everyone in their bedrooms. Press the smoke alarm test button and shout "Fire!" to mimic the alarm sound. This helps everyone recognize the noise and reduces panic during a real emergency. Each person should roll out of bed, stay low to avoid smoke, and crawl to the nearest exit. Before opening any door, use the back of your hand to check if it's hot - if it is, use the alternate route instead.
Time the evacuation using a stopwatch. According to the American Red Cross, you may only have about two minutes to escape during an actual fire. Once outside, practice having someone call 911, and stress the importance of never going back inside for belongings or pets.
To make the drill more realistic, run a second round where you announce that the main door is "blocked" or "hot", forcing everyone to use backup exits like a window with an escape ladder. Conduct the drill at night with lights off to simulate an actual emergency. Aim to practice at least twice a year, or whenever there are changes to your home layout or household members. After each drill, discuss any challenges - like stuck windows or cluttered hallways - and update your plan as necessary.
Once fire drills are covered, move on to preparing for extreme weather scenarios.
Severe Weather and Shelter-in-Place Drills
Severe weather drills prepare your family for emergencies like tornadoes, hurricanes, and winter storms. For tornadoes, identify a small, interior room on the lowest level of your home, such as a basement, hallway, bathroom, or closet, away from windows and exterior walls. When the drill begins, time how long it takes everyone - including pets - to get to the safe room. Practice crouching low and covering your head and neck with your arms or a pillow. It’s also helpful to rehearse bringing a small emergency kit with essentials like water, a flashlight, and a battery-powered or hand-crank radio.
For hurricanes or major storms, choose an interior area away from windows and potential debris. Practice closing shutters or boarding up windows, moving outdoor furniture indoors, and storing important documents in waterproof containers. Have an adult demonstrate how to safely shut off utilities like gas, water, and electricity. Set up emergency lighting using flashlights or lanterns, and test batteries regularly to ensure they’re ready when needed.
Winter storm drills should focus on staying in one or two easily heated rooms. Practice layering clothing and blankets, and rehearse using backup heat sources safely, following the manufacturer’s instructions to ensure proper ventilation. During any severe weather drill, close doors behind you as you move to the safe area to create an extra barrier of protection. Wrap up by reviewing communication methods, like NOAA weather radio alerts, and discussing when to switch from sheltering in place to evacuation. Scheduling these drills seasonally can help align them with typical U.S. weather patterns.
Family Evacuation and Bug-Out Drills
Family evacuation drills ensure everyone knows how to leave home quickly when staying inside is no longer safe. Start by preparing go-bags for each family member (and pets), including essentials like water, non-perishable food, medications, flashlights, a radio, batteries, important documents, a first-aid kit, clothes, and hygiene items. Keep these bags near your main exit or vehicle for easy access.
Sound an "evacuate" signal, and have everyone grab their go-bags and meet at the designated vehicle. Practice loading the bags in a specific order to avoid leaving anything behind, and work on improving the process with each drill.
Map out and rehearse both a primary and alternate driving route to your evacuation destination, such as a relative’s home or an official shelter, in case roads are blocked. Include your pets in the drill by practicing how to secure them safely. If you live in a rural area, rehearse moving livestock to safer ground or releasing them to secure pastures, following local emergency guidelines. You might also simulate checking on elderly neighbors or coordinating with nearby households if that’s part of your plan.
After the drill, review whether all critical items - like IDs, insurance papers, cash, maps, and medications - were successfully gathered. Address any issues, such as dead flashlight batteries or missing gear, right away. Update your written plan, post maps and instructions in visible areas, and set a date for your next drill.
For trusted survival gear and more emergency resources, visit AgentXSurvival at https://agentxsurvival.com.
5 IMPORTANT Emergency Drills That Could Save Your Life
sbb-itb-1666494
Tools and Resources for Emergency Drills
Having the right tools and supplies on hand can make your emergency drills more effective, ensuring you’re prepared for real-life scenarios.
Communication Tools for Emergencies
When disasters strike, cell towers might fail or networks could become overloaded. That’s why it’s crucial to have backup communication methods. A NOAA Weather Radio with tone alerts and battery backup is a must. These radios broadcast continuous updates from National Weather Service stations and can alert you to severe weather. Look for models with SAME (Specific Area Message Encoding) technology, which lets you filter alerts for your local area. Most battery-powered or hand-crank radios cost between $25 and $70 and work even during power outages.
Another useful option is handheld two-way radios (FRS/GMRS walkie-talkies). These allow family members to stay connected during evacuations or shelter-in-place scenarios without relying on external networks. Basic pairs typically cost $30 to $80. To keep things simple during drills, create and practice using codes like "all clear" or "need help." Additionally, whistles are a low-tech but effective way to signal your location when voices or electronic devices aren’t an option.
Incorporate these tools into your drills. For example, have someone monitor the NOAA radio during a simulated tornado warning, practice coordinating with walkie-talkies during a nighttime evacuation, or use whistles to signal when everyone has reached the meeting point. Testing these tools at least twice a year ensures batteries are fresh and equipment is in working order. These hands-on exercises will help your family feel more confident during an actual emergency.
Emergency Kits and Gear
Preparedness goes beyond communication tools - your emergency supplies are just as critical. Stock a three-day supply of water (1 gallon per person per day), non-perishable food, a first aid kit, flashlights with spare batteries, a manual can opener, and essential sanitation items. Keep go-bags ready for each family member near exits or in your vehicles. These bags should include water, snacks, a flashlight or headlamp, basic first aid supplies, copies of IDs, cash, a whistle, extra clothing, and phone chargers.
For lighting during power outages, consider battery-powered flashlights, headlamps, or solar lanterns. Battery-powered LED lanterns cost around $10–$30, while solar models range from $15 to $40. Place these lights in accessible spots like bedside tables or near exits so they’re easy to find in the dark. During nighttime evacuation drills, practice navigating with just your emergency lighting. Avoid using candles, as they pose a fire risk, especially if gas leaks are a concern.
Your first aid kit should include essentials such as bandages, antiseptics, pain relievers, tweezers, and any prescription medications your family needs. During drills, simulate minor injuries and have someone designated as the family medic practice treating them. This builds familiarity with the kit and helps identify any missing items. If you’re preparing for extended emergencies, directories like AgentXSurvival can help you find additional gear like water filtration systems, EMP protection, and long-term food storage options.
Reviewing and Upgrading Equipment
To keep your emergency gear in top shape, schedule regular maintenance checks at least twice a year. Many families find it helpful to align these reviews with daylight saving time changes. Replace stored water every three months and rotate food supplies every six months or as expiration dates approach. Test and replace batteries in flashlights, radios, and smoke detectors, and check that water filters are functioning properly. Make sure all medications are up to date and your first aid kit is fully stocked.
After each drill, take note of what worked and what didn’t. For instance, if a flashlight’s batteries were dead or a water filter clogged, address these issues immediately. Personal straw-style water filters typically cost $15–$25, while larger family-sized gravity filters range from $70 to several hundred dollars, depending on capacity. If you’re concerned about electromagnetic pulse (EMP) events, consider investing in Faraday bags to protect radios and phones. These cost between $20 and $80. During drills, practice retrieving and using these protected devices to ensure you can activate them when needed.
Keeping a record of your equipment reviews and upgrades will help you maintain a state of readiness throughout the year.
Customizing Drills for Your Family
When it comes to emergency drills, one size does not fit all. Every family is unique, and your drills should reflect the specific needs of your household.
Drills for Families with Children and Seniors
Adapting drills to fit the ages and abilities of your family members ensures everyone knows how to respond in an emergency. For preschool-aged children (3–5 years old), focus on simple actions like listening for alarms, staying low, and following an adult. Turning these actions into short, repetitive games can make drills less intimidating and more routine. Elementary-aged kids can take on tasks like closing doors, grabbing essentials, or helping younger siblings. Older children might assist by carrying go-bags or serving as buddies, while adults remain responsible for key decisions.
For seniors or individuals with mobility challenges, plan ahead by assigning ground-floor rooms and creating clear, obstacle-free escape routes. Use tactile markers for those with visual impairments, and designate helpers with backups in case someone isn’t home. If a family member has hearing impairments, install smoke alarms with strobe lights or bed-shaker devices and use visual signals - like a flashlight pattern - during drills. For those with dementia or cognitive challenges, keep instructions simple and focus on a couple of key actions, such as staying with their helper and heading to the meeting point.
Including Pets and Livestock in Drills
Pets are part of the family, so they need to be included in your emergency plans. Assign each pet to a specific person to ensure no one is left behind. Practice leashing dogs, placing cats or small pets in carriers, and moving them to your safe room or evacuation vehicle. Keep pet go-bags near exits with essentials like food, water, medications, vaccination records, and comfort items. Since many public shelters don’t allow pets, research pet-friendly shelters, hotels, or boarding facilities ahead of time. Regular, short drills can help pets associate carriers and leashes with calm routines instead of panic.
For rural families with livestock, having a written emergency plan is crucial. Practice capturing, haltering, and securing animals, and develop both evacuation and shelter-in-place strategies. Time your drills to see how quickly you can lead animals to trailers or safer pastures, and practice loading and unloading under calm conditions. In cases where evacuating entire herds isn’t feasible, prepare for sheltering in place by reinforcing barns, securing loose materials, and stocking up on extra water and feed. Identify interior zones where animals will be safest from wind and debris. Regular drills help you fine-tune your plans and determine when to act, such as moving animals early during wildfire season instead of waiting for mandatory evacuation orders.
Adjustments for Rural Homesteads
If your property has multiple buildings - like a main house, barn, or workshop - zone-based plans are essential. Map out primary and secondary exits for each structure, and post clear instructions showing how to reach the nearest safe outdoor area and the family meeting point. Test drills at different times of day to ensure everyone can reach the meeting spot efficiently. On larger properties, mark safe paths with reflective stakes, solar lights, or painted markers to guide movement in low visibility conditions caused by smoke, snow, or heavy rain. Since cell service and power might fail, practice backup communication methods to stay connected.
Rural families also need to prepare for extended emergency response times, which may stretch to 72 hours or more. Combine your drills with self-sufficiency checks, such as testing backup power systems, water filtration setups, off-grid cooking gear, and first-aid supplies. Scenario-based drills - like simulating a winter storm with closed roads and no power for 48 hours - can help you practice consolidating everyone into a heated area, rationing water, and using battery- or crank-powered radios for updates. For wildfires or hurricanes, timed evacuation drills should include loading trailers, securing fuel and tools, and driving both primary and alternate routes to safe zones, keeping in mind that roads may be blocked or emergency services delayed.
To prepare for long-term scenarios, many rural families rely on directories of specialized gear, such as those offered by AgentXSurvival, which provides equipment designed for extended blackouts and survival situations. The key isn’t just owning the gear - it’s practicing with it to ensure you’re ready when it matters most.
Conclusion: Building Resilience Through Practice
Emergency drills play a key role in helping families stay prepared. They build confidence and create the muscle memory needed to act quickly during a crisis. Consistent practice reduces panic, improves reaction times, and transforms plans into habits that everyone in the family can follow instinctively. For children, these drills provide clear steps to follow, replacing fear with understanding, while adults gain peace of mind knowing their tools, exits, and communication methods are reliable under pressure.
To maintain readiness, establish a regular drill schedule. For instance, plan fire and nighttime evacuation drills twice a year - spring and fall work well. Include severe weather or shelter-in-place drills once or twice annually, depending on your region, and conduct a full family evacuation drill each year. You can tie these drills to key events, like the start of the school year, Daylight Saving Time changes, or hurricane season, to make them part of your routine. Mark the dates on a shared calendar and treat them as non-negotiable commitments.
After each drill, take time to evaluate and improve. Ask simple but important questions: Did everyone hear the signal? Did each person fulfill their role without confusion? Were there any challenges, like dead flashlight batteries or blocked exits? Identify two areas for improvement - whether that’s relocating go-bags, adding a nightlight near an exit, or practicing with a pet - and update your emergency plan accordingly. Keeping a log of drill dates and lessons learned can help you track progress and refine your approach over time.
Make it a habit to review and update your plan annually or whenever major changes occur, such as moving to a new home, adding family members or pets, or facing new local risks like wildfires. This ongoing cycle of practice, review, and adjustment ensures that weak points are addressed before a real emergency happens.
For families looking to enhance their preparedness beyond basic kits - such as adding off-grid power, extended food and water supplies, or blackout-ready gear - resources like AgentXSurvival provide a range of vetted options to explore and plan upgrades.
Set a goal to schedule your first drill within the next 30 days. Review your emergency plan, ensure you have at least three days’ worth of supplies, and conduct the drill. Afterward, do a quick review to identify areas for improvement and schedule your next practice. Building resilience takes time, but consistent effort ensures your family is ready to respond with confidence when it matters most.
FAQs
Including children and pets in emergency drills is a crucial step in keeping everyone safe. For children, focus on clear, age-appropriate explanations to help them understand what’s happening. Keep the drills simple and engaging by assigning them easy-to-follow roles. Regular practice can boost their confidence and help them feel more prepared if an actual emergency occurs.
For pets, preparation is just as important. Have a pet emergency kit on hand with essentials like food, water, and any medications they might need. Practice evacuating with leashes, carriers, or crates so they’re familiar with the process. Keeping these drills calm and low-stress ensures that both people and pets can handle a real emergency more smoothly.
During a family emergency, staying connected is crucial for ensuring everyone's safety and well-being. Reliable communication tools can make all the difference. Two-way radios are a dependable option, especially when cell networks fail, offering a lifeline in critical moments. Cell phones loaded with emergency contacts provide quick and easy access to essential numbers, streamlining communication during high-stress situations. For those in remote or off-grid locations, satellite phones are an excellent choice, as they operate independently of local networks. Whatever tools you choose, ensure they're simple to use, and take the time to familiarize every family member with their operation.
It's wise to go over your family's emergency plan at least once a year. But if big changes happen - like relocating, welcoming new family members, or updates to safety guidelines - take the time to revise it sooner. Running regular drills ensures everyone knows what to do and feels ready to handle a real emergency.