
A survival spear is a simple and effective tool for hunting, fishing, and protection in the wild. It’s made from a wooden shaft with a sharpened tip and can be crafted using basic tools like a knife or sharp rock. This guide covers how to select materials, shape the shaft, and create a durable tip. Key points include:
- Materials Needed: Straight wood (6–8 feet long), a knife, cordage (paracord, vines, or bark), and optional spearhead materials (stone, bone, or metal).
- Steps:
- Prepare the Shaft: Choose sturdy wood, strip branches, and smooth the surface.
- Carve the Tip: Sharpen one end into a point using controlled cuts.
- Harden the Tip: Rotate it over hot coals to strengthen the wood.
- Optional: Attach a stone, bone, or metal spearhead for added durability.
- Safety Tips: Carve away from your body, secure the spearhead tightly, and handle the spear with care to avoid injuries.
- Uses: Spearfishing, hunting small game, self-defense, and camp tasks like probing the ground or handling firewood.
While quick to make, a survival spear requires practice for effective use. Always check local laws before using one for hunting. For more advanced techniques or pre-made gear, consider combining your skills with modern survival tools.
How-To Make A Survival Spear - Survival Techniques & Bushcraft
Materials and Tools You'll Need
Crafting a survival spear can be done using natural resources or items from a standard survival kit. The key is selecting the right shaft, a suitable tip, and effective tools. Let’s break down what you’ll need to create a reliable and durable spear.
Selecting a Spear Shaft
The shaft is the backbone of your spear, so choosing the right piece of wood is critical. Ideally, it should be 6–8 feet long and about 1–1.5 inches in diameter. This size offers enough reach and leverage for thrusting or throwing without being too heavy or unwieldy.
Look for a straight piece of wood without knots. Freshly cut (green) wood is easier to carve and less prone to splitting, while weathered wood can be brittle. Check for creaks or weak spots along the length of the wood to ensure it’s sturdy.
In North America, hardwoods like maple, ash, hickory, and oak are excellent options. These woods are durable, hold a sharp point, and can handle repeated impacts. If you’re in the Eastern woodlands, you’ll find plenty of straight hardwood saplings. In desert or scrubby areas, woods like mesquite or juniper may work, though they can be harder to find. In the Pacific Northwest, straight wood is abundant, but the high humidity means you’ll need to dry and fire-harden the tip more carefully.
When cutting your shaft, aim to harvest it at ground level or just above a branch junction to maximize its usable length. Remove side branches and strip off the bark to reveal any hidden flaws and help the wood dry evenly.
Spear Tip Options
Once your shaft is ready, the next step is choosing the tip. Each type has its strengths and weaknesses, depending on your needs and resources.
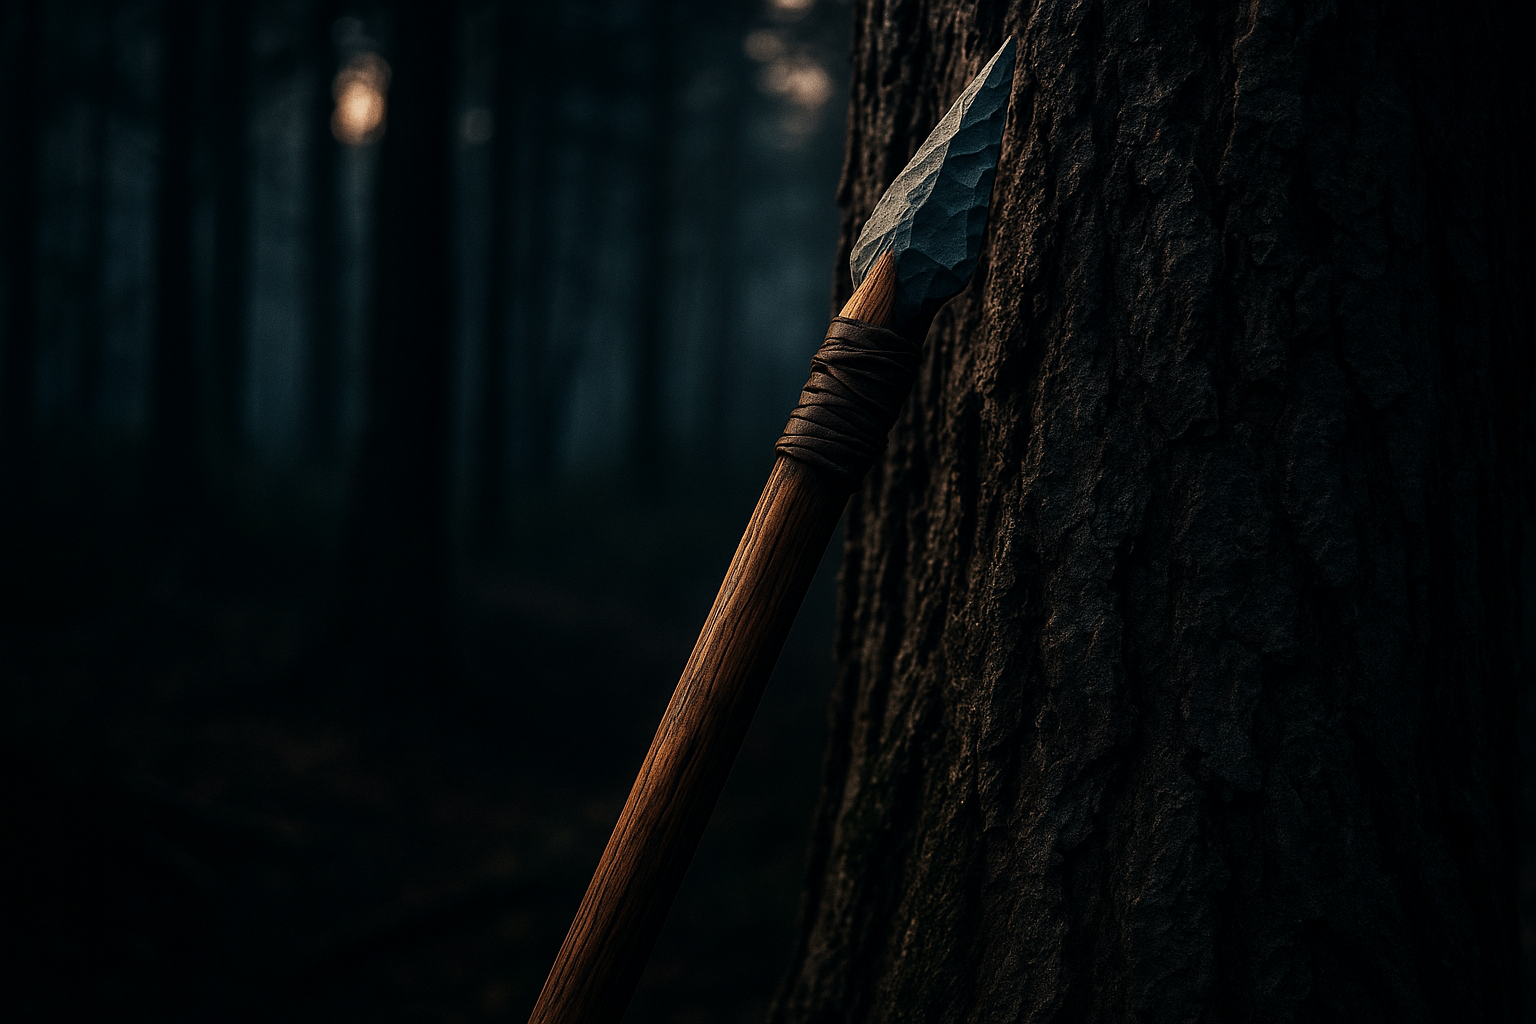
- Wooden tips: Carve a simple point using a knife or sharp stone. For better durability, fire-harden the tip by rotating it over hot coals (not open flames) until it chars slightly. This strengthens the wood and helps it resist dulling.
- Stone tips: These are sharp and effective but require more effort to create. Materials like flint, obsidian, or chert can be chipped into a pointed flake. Secure the flake into a notch on the shaft using cordage. While sharp, stone tips can be brittle if not properly shaped and lashed.
- Bone tips: Bones or antlers can be shaped into strong, lightweight points. They’re easier to work with than stone but may not be as sharp. Bone tips are great for fishing or hunting medium game.
- Metal tips: If you have access to modern tools, metal tips are the most effective. You can lash a knife, multi-tool, or even a screwdriver to the shaft. Commercial spearheads are even better, as they’re designed for this purpose. Just ensure the blade is securely lashed and faces away from your grip for safety.
| Spear Tip Type | Pros | Cons |
|---|---|---|
| Wooden point | Easy to make; lightweight | Dulls quickly; less durable |
| Stone point | Sharp and effective for cutting and penetration | Time-intensive to make; brittle without proper lashing |
| Bone point | Strong and lightweight; easier to shape than stone | Requires access to suitable bones; can crack if poorly shaped |
| Metal point | Durable, sharp, and easy to resharpen | Requires pre-existing tools or gear |
Basic Tools Required
To build your spear, you’ll need a few essential tools:
- Fixed-blade knife: This is your most important tool for carving the shaft, shaping the tip, and preparing cordage.
- Folding saw or compact saw blade: Perfect for cutting saplings cleanly and trimming branches without damaging the wood.
- Hatchet or small axe: Useful for felling thicker saplings and rough shaping, especially when crafting multi-pronged spears.
- Cordage: Essential for lashing spearheads and reinforcing the shaft. Modern options like 550 paracord, bank line, or nylon cord are ideal. Even shoelaces can work in a pinch. Aim to carry 10–25 feet of strong cordage in your survival kit.
If you don’t have modern cordage, you can make it from natural materials. Inner bark, plant fibers, or animal sinew can be twisted into strong bindings. Rawhide strips also work well, tightening as they dry.
Additional helpful items include:
- Duct tape or cloth tape: For reinforcing lashings and stabilizing cracked shaft ends.
- Sharpening tool: A small stone or pull-through sharpener keeps your blade and wooden tips in top shape.
- Fire-starting tools: A ferro rod or lighter is vital for fire-hardening wooden tips.
For those who like to prepare ahead, consider adding premade metal spearheads or arrowheads to your survival kit. These can be lashed to a shaft in minutes, saving time and effort. Resources like AgentXSurvival offer pre-tested survival gear, including spearheads and cordage, designed for various environments in the U.S.
In a situation where no modern tools are available, sharp stones and natural cordage like bark or vines can still get the job done. Though slower and more challenging, these materials can produce a functional spear entirely from the wild. Once you’ve gathered your materials and tools, you’re ready to start shaping your spear.
How to Make a Basic Wooden Spear
Creating a basic wooden spear involves three key steps: preparing the shaft, carving the tip, and hardening it with fire. Each step requires patience and attention to detail to ensure your spear is both functional and durable.
Cutting and Preparing the Shaft
Start by selecting a straight sapling or piece of wood for your spear. Remove all branches and offshoots using a knife, hatchet, or even a sharp stone. Make clean cuts close to the trunk to avoid leaving stubs that might snag or cause splinters.
Next, strip off the bark and smooth the surface. Freshly cut saplings are easier to work with, as their bark peels away more readily. Use your knife or stone to scrape away any rough patches or knots, paying attention to areas that could weaken the shaft. The goal is to create a smooth, cylindrical shape that feels balanced in your hand.
If the shaft has a slight curve, you can try to straighten it by gently heating the curved area and carefully bending it. This takes practice, as too much force can snap the wood. Always work on a stable surface or while seated to maintain control and reduce the risk of injury. Once your shaft is smooth and straight, you're ready to shape the tip.
Carving the Spear Tip
With the shaft prepared, it's time to carve the spear's tip. Secure the shaft on a stable surface to prevent it from slipping. Always carve away from your body to avoid accidents.
Use a sharp knife or stone to shape the tip. Gradually carve from the sides toward the center, creating a smooth taper that ends in a sharp point. Focus on making shallow, controlled cuts to maintain precision and reduce the chance of the blade slipping. Aim for a taper that extends about 12 to 18 inches from the end of the shaft. This gradual taper ensures strength while still delivering a sharp point.
The tip should be sharp enough for effective use, but not so thin that it becomes fragile. Test the sharpness by carefully running your thumb along the edge - not across it. If you're using a stone tool, you can enhance sharpness with knapping techniques, though this requires more time and skill. Once satisfied with the shape, you can move on to hardening the tip.
Hardening the Tip with Fire
Fire-hardening strengthens the tip, making it more durable and resistant to splintering. To start, build a small fire and let it burn down to glowing coals. Avoid open flames, as they can scorch the wood.
Hold the spear tip 6–12 inches above the hot coals, rotating it constantly to heat the wood evenly. The goal is to lightly brown or darken the surface without charring it. This process typically takes 5–15 minutes, depending on the wood and heat level. If the tip begins to char or smoke heavily, move it farther from the heat immediately.
Never hold the spear directly over open flames, as this increases the risk of accidental ignition. Keep water or sand nearby to handle any mishaps, and ensure your fire is in a safe, controlled area away from flammable materials.
Once the tip has darkened and hardened, let it cool naturally. Avoid rapid cooling, such as plunging it into water, as this can cause cracks. When cooled, the tip will feel harder and more durable. Test it by pressing it against a piece of wood; it should hold its point better than an untreated tip.
With the tip hardened, your wooden spear is complete. If you're working without steel tools, sharp stones or bones can be used for carving and shaping. While this requires more effort and skill, it’s entirely possible to craft a reliable spear using only natural materials found in the wild.
sbb-itb-1666494
Advanced Spear Modifications
Once you’ve mastered crafting a basic wooden spear, you can take it a step further by tailoring it for specialized survival tasks. These modifications can make your spear more effective in specific scenarios. For example, a multi-pronged fishing spear improves your chances of catching fish, while a detachable spearhead allows you to swap out a damaged tip without starting from scratch. These tweaks not only enhance your spear’s functionality but also equip you to handle a variety of survival challenges.
Making a Multi-Pronged Fishing Spear
A multi-pronged spear is perfect for fishing because it increases your chances of success with a wider strike zone. Instead of relying on a single point, the multiple tines help compensate for small aiming errors. Start with a straight wooden shaft about 8 feet long - this length gives you enough reach to spear fish without scaring them away.
Here’s how to create it:
- Use a knife to carefully split the last 10–12 inches of the shaft into three to five even sections. Make shallow cuts at first, gradually deepening them to avoid weakening the shaft.
- To keep the prongs separated, carve a small wooden wedge and insert it about 2–3 inches from the tip of the splits. Secure the wedge by wrapping cordage tightly around the shaft just below the splits. If you don’t have modern cordage, you can use natural materials like twisted inner bark from basswood or willow.
- Sharpen each prong to a fine point, then fire-harden the tips by exposing them briefly to a flame. This step strengthens the points and increases their durability. For added effectiveness, you can carve shallow barbs to help retain fish once speared.
When using your fishing spear, move slowly and approach from downstream to avoid stirring up silt or casting a shadow that might spook the fish. Stand in stable, shallow water - knee-deep or less - and use a downward or slightly forward thrusting motion. Keep in mind that light refraction can make fish appear higher than they actually are, so aim just below their apparent position. Practicing on floating objects like sticks or leaves can help you refine your technique before targeting live fish.
Attaching a Detachable Spearhead
A detachable spearhead offers better penetration and durability compared to a simple wooden point. Plus, it’s easy to replace if the tip gets damaged, making it a practical choice for extended use.
To attach a detachable spearhead, follow these steps:
-
Prepare the Shaft: Use your knife to notch the end of the shaft. For a flat stone or bone head, split the shaft about 2–3 inches deep to create a slot. For a tanged metal head (like a reshaped piece of rebar or a heavy nail), carve a round hole to match the tang’s diameter. Ensure the notch is deep enough to hold the head securely without compromising the shaft’s strength.
-
Secure the Spearhead: For flat stone or bone heads, seat the base into the slot and insert thin wedges on either side for a snug fit. For tanged heads, insert the tang fully into the hole. Bind the spearhead tightly using strong materials like paracord, nylon line, or duct tape. If modern materials aren’t available, natural options like rawhide, animal sinew, or twisted plant fibers work well. Wrap the bindings in a figure-eight pattern at least 10 times, finishing with a tight knot. Coating natural fibers with pine pitch or resin can add extra security.
-
Knife as a Spearhead: In some situations, you can use your belt or bushcraft knife as a detachable spearhead. Position the knife with its spine against the shaft, ensuring the handle and tang are well supported by the wood. Lash it securely with tight wraps, leaving part of the handle accessible. Always position the sharp edge away from your body, and avoid throwing this type of spear since losing or damaging your primary knife could be a serious setback.
If you’re in the U.S., remember to check local laws regarding weapons and hunting when not in a genuine survival situation.
Spear Tip Comparison
Different spear tips are suited for different tasks. Here’s a quick comparison of their strengths and uses:
| Spear Tip Type | Durability | Best Use | Ease of Construction | Penetration Power |
|---|---|---|---|---|
| Fire-Hardened Wood | Medium–High | Hunting, fishing | Easy–Medium | Medium–High |
| Stone/Flint | High | Hunting, fishing | Medium | High |
| Bone | Medium–High | Hunting, fishing | Medium | Medium–High |
| Multi-Prong (Fishing) | Medium | Fish, small game | Medium | Medium |
| Detachable Head (Metal/Stone) | High | Hunting, versatility | Medium–Hard | High |
Fire-hardening is a simple way to boost the durability and effectiveness of wooden tips. Stone and bone heads, while more challenging to craft, offer excellent longevity and performance. Multi-pronged tips are ideal for fishing, and detachable spearheads provide the flexibility to replace damaged tips, making them a great choice for long-term use.
Using and Maintaining Your Spear
A well-cared-for spear can be your reliable companion for weeks - or even months - whether you're hunting, fishing, or using it for protection. On the other hand, neglecting it could leave you vulnerable when you need it most. Regular upkeep and proper handling are key to keeping your spear in top condition and ensuring your safety.
Proper Handling Techniques
Thrusting is your go-to technique for close-range control. To do this effectively, stand with your feet shoulder-width apart and one foot slightly forward for balance. Hold the spear with both hands - your dominant hand near the balance point (about one-third of the way from the butt end) and your other hand closer to the rear for stability. Push the spear forward in a straight motion, keeping your eyes locked on the target and your body positioned behind the weapon. This method is particularly effective for hunting larger animals or defending yourself because it allows for quick recovery and steady control.
Throwing a spear comes with more risk. If you miss or the spear breaks, you could be left defenseless. Only consider throwing your spear when you're confident in your aim and have a clear escape route. Practice on large, stationary targets like tree stumps from a distance of 10–15 feet. Start with half power until you can reliably stick the spear. Use a smooth overhand motion, stepping forward as you release, and aim slightly below your target to account for the arc of the throw.
When spearfishing, stand in shallow water and remain still - any sudden movement will scare the fish away. Use quick, straight thrusts rather than sweeping motions for better accuracy.
Your spear can also double as a defensive staff. Grip it with both hands about shoulder-width apart, keeping the tip pointed at any potential threat. Practice slow, controlled movements, such as high and low blocks or straight jabs, to build muscle memory. Be cautious with hard strikes on thin shafts, as they could crack the wood.
To sharpen your skills, mark a fist-sized spot on a log or hay bale at chest height. Practice 20–30 controlled thrusts per session from 4–6 feet away. You can also work on a step-and-thrust drill: start in a relaxed stance, step forward with your lead foot, thrust in one fluid motion, then quickly return the spear to a guard position. These exercises help you refine your balance, improve reach, and identify weaknesses in your grip - critical skills for real-life scenarios.
Once you're confident in your handling abilities, focus on maintaining your spear to ensure it’s always ready for action.
Inspecting and Repairing Your Spear
Regular inspections and timely repairs are essential for a dependable spear. After each use - or at least daily when in the field - check the following:
- Shaft: Look for cracks, dents, or soft spots that could indicate rot. Pay special attention to knots and thin areas, as they’re more prone to splintering or flexing.
- Bindings: Check for fraying, looseness, or gaps. Press on the bindings to ensure they’re secure; if they shift under pressure, they may fail when it matters most.
- Tip: Wooden tips should be sharp and smooth, free of mushrooming or splitting. Stone or bone tips may chip or crack, while metal tips should be inspected for rust, looseness, or rolled edges.
If you find any damage, repair your spear before using it again.
To re-sharpen a wooden tip, carve a clean point with a knife or sharp stone, removing any split or crushed fibers. Smooth the surface with finer abrasives like sand. For added durability, harden the tip by holding it near - not in - the flames of a small fire. Rotate it constantly until the wood browns slightly but doesn’t char. Let it cool, then scrape off any surface residue. Test the tip by piercing softer materials like bark or a rotted log; it should penetrate cleanly without bending or chipping.
If the bindings fail, re-seat the spearhead firmly and re-wrap it with the best available cordage. Natural options include inner bark from basswood or cedar, spruce roots, or twisted grasses. Modern materials like paracord, boot laces, or duct tape are even more reliable. Secure each wrap tightly and finish with a locking knot or by tucking the ends under previous wraps. Test the binding by twisting and pulling on the spearhead with both hands - if it stays firm, it’s ready for use.
For metal or knife heads, keep the edge sharp with a small sharpening stone or field sharpener. After exposure to rain, snow, or blood, clean and dry the metal parts, then apply a thin layer of oil to prevent rust.
Storage and Transport Tips
How you store and transport your spear can significantly impact its lifespan. Always cover the tip when the spear isn’t in use. You can improvise a cover using carved wood, thick leather, folded cardboard, or layered cloth secured with tape.
Store the spear off the ground and away from direct rain or intense sunlight. A dry, well-ventilated spot is ideal. Avoid placing the shaft on wet soil or leaving it in standing water. In camp, lean it against a tree or shelter support, or lay it flat in a visible spot where it won’t be stepped on.
When carrying your spear on foot, keep the tip pointed upward or angled away from yourself and others. If moving through thick brush, carry it horizontally at shoulder height with the tip slightly elevated. And remember - never run with a spear.
For vehicle transport, always cover the tip and secure the spear to prevent movement. Be aware that some U.S. jurisdictions have regulations regarding carrying spears or large bladed weapons in public or in vehicles, so check local laws to avoid legal issues.
For high-quality spearheads, durable cordage, and protective sheaths, check out AgentXSurvival (https://agentxsurvival.com).
Conclusion
The survival spear is one of humanity's oldest and most versatile tools, proving its worth in emergency situations. It’s a dependable way to hunt, protect yourself, and handle camp tasks when other equipment isn’t available.
Crafting a spear is straightforward: start with a straight 6–8-foot shaft, smooth out knots and branches, and sharpen one end. Strengthen the tip by exposing it briefly to hot coals - a process called fire-hardening. For added durability and effectiveness, you can attach a stone, bone, or metal point by lashing it into a carved notch. Depending on your needs, you can modify the design - split the end for fishing or add a detachable spearhead for greater flexibility.
The true value of a spear lies in its many uses. A well-made spear can help you test water depth, probe underbrush for hazards like snakes or unstable ground, fend off dangerous animals, lift burning logs from a fire, or even act as a walking staff on rough trails. It can also be incorporated into shelter construction or used in traps, making it an indispensable survival tool when resources are scarce.
To get the most out of this tool, practice crafting and using it in safe, legal areas. Focus on controlled thrusts and proper handling techniques. Always carve away from your body, keep others at a safe distance, and sheath the tip when transporting the spear.
Combining this skill with modern survival gear ensures you're prepared for anything. While a handmade spear is a valuable tool in a pinch, it works best as part of a broader survival plan. Gear like a sturdy knife, strong cordage, and a reliable fire-starting kit can make spear crafting faster and more effective. For high-quality survival tools, self-defense training, and guides on off-grid living, check out AgentXSurvival.
In high-stress situations, remember the basics: use strong, straight wood; sharpen and fire-harden the tip; store and handle it safely; adapt the design as needed; and practice regularly. Mastering these skills builds confidence and enhances your ability to survive using both primitive tools and modern gear.
FAQs
When making a survival spear, hardwoods such as oak, hickory, and ash are your best options. They’re tough, long-lasting, and less prone to splitting under pressure. If you're in a damp or wet area, cedar or willow can be better choices since they naturally resist rot. Make sure to pick a straight, knot-free piece of wood to ensure the spear is both sturdy and dependable.
To firmly secure a spearhead to its shaft, opt for natural materials like vines, plant fibers, or strips of bark as cordage. Wrap the cordage tightly around both the spearhead and the shaft, making sure to thread it through any holes or grooves in the spearhead for better stability. For an even stronger grip, carve a small notch or groove into the shaft to prevent the spearhead from sliding out of place. If you have access to sinew or extra bark strips, use them to reinforce the binding for a sturdier and longer-lasting hold.
To practice using a survival spear safely, begin with soft targets like training dummies or hay bales. Start by mastering the basics - thrusts, swings, and controlled throws. As your skills improve, you can gradually challenge yourself with more complex techniques. Always wear protective gear and ensure your practice area is free of obstacles or hazards to minimize the risk of injury. Regular practice, combined with a strong focus on safety, will help you develop both precision and confidence in handling the spear.