
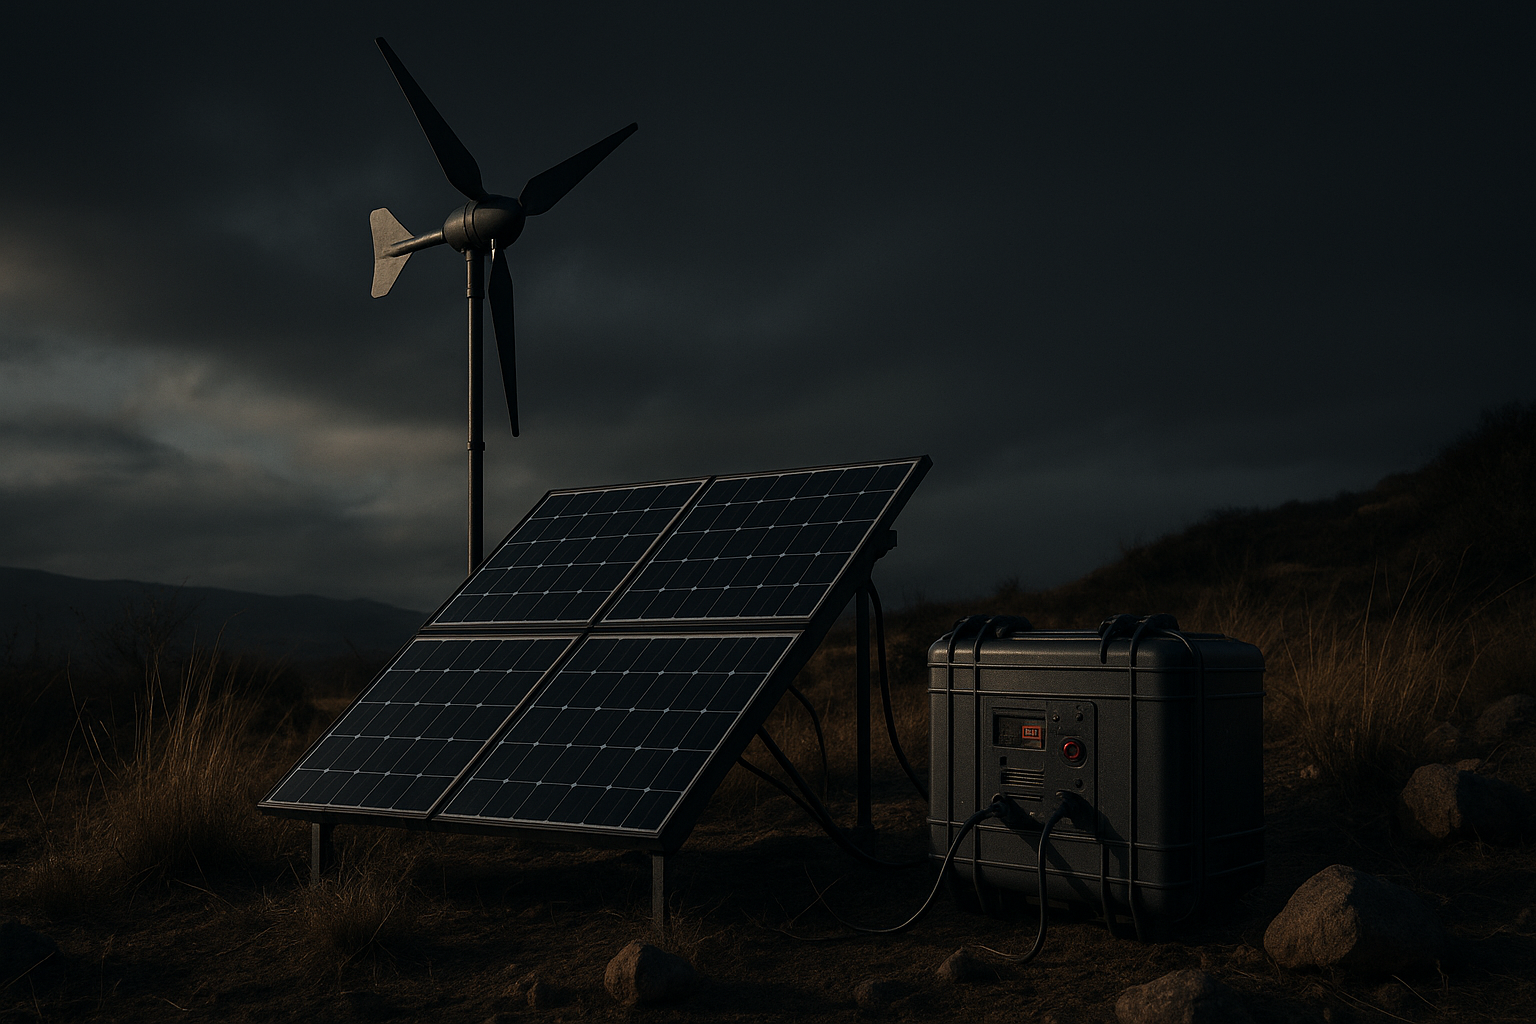
Want reliable power, even off-grid or during outages? A hybrid solar and wind system might be the solution. Combining solar panels and wind turbines ensures consistent energy production, day and night, across varying weather conditions. Here's what you need to know:
- How it works: Solar panels generate power during sunny days, while wind turbines take over when it's cloudy or nighttime. A hybrid charge controller manages both inputs, storing energy in batteries for later use.
- Cost: A residential system typically costs $10,000–$30,000 but offers long-term energy savings and independence.
- Key components: Solar panels, wind turbines, a hybrid charge controller, batteries, and an inverter.
- Installation: Requires tools like wrenches, multimeters, and safety gear. Proper site assessment for solar exposure and wind speeds is critical.
- Maintenance: Clean solar panels regularly, inspect wind turbines for wear, and monitor battery health.
This guide walks you through everything from setup to maintenance, helping you build a system that reduces grid reliance and keeps your essential devices running. Ready to get started? Keep reading for the full step-by-step breakdown.
DIY Solar And Wind Power Hybrid System
Tools, Materials, and Site Assessment
Getting the right tools and materials is just as important as having a solid design when it comes to building a reliable hybrid solar and wind system. Proper preparation ensures not only a safe installation but also long-term system performance. Let’s dive into the tools, safety gear, and materials you’ll need, along with tips for assessing your site.
Required Tools and Safety Equipment
Installing a hybrid solar and wind system calls for a mix of basic tools and specialized electrical gear. Here’s a breakdown of what you’ll need:
- Hand tools: Adjustable wrenches, screwdrivers, wire cutters/strippers, and a drill.
- Electrical tools: A multimeter for measuring AC/DC voltage, current, and resistance, as well as a voltage tester to confirm circuits are de-energized.
- Other essentials: A sturdy ladder for elevated tasks.
Safety is non-negotiable when working with electrical components or heights. Equip yourself with:
- Electrically rated insulated gloves
- Safety goggles to shield against debris and sparks
- A hard hat for overhead work
- Non-slip work boots for secure footing
- A GFCI (Ground Fault Circuit Interrupter) outlet for added protection during testing
Additionally, never work alone on elevated structures like wind turbine towers, and always disconnect power sources before handling electrical connections. Following the National Electrical Code (NEC) and local regulations is critical for safety and compliance.
Materials List for the System
Your hybrid system relies on several key components working in harmony. Here’s what you’ll need:
- Solar panels: Choose from monocrystalline (high efficiency), polycrystalline (balanced performance), or thin-film (space-intensive). Monocrystalline panels are often the best choice for long-term value in DIY setups.
- Wind turbines: These are typically rated between 1 and 3 kW for residential use, with prices ranging from $1,200 to $5,000. Keep in mind that turbines require average wind speeds of at least 9 mph to function effectively.
Other critical components include:
- A hybrid charge controller to manage both solar and wind inputs
- A deep-cycle battery bank to store energy and match your power needs
- An inverter to convert DC power into standard 120V AC electricity
Don’t forget proper wiring and hardware, such as cables with appropriate gauges, circuit breakers, disconnect switches, and mounting hardware for solar panels. Wind turbines also need a tower kit - typically around 20 feet tall for small off-grid setups, though taller towers perform better in capturing wind energy.
Here’s a quick cost breakdown for key components:
| Component Category | Price Range (USD) | Typical Specifications | Key Considerations |
|---|---|---|---|
| Solar Panel Kit | $1,500–$3,000 | 2–4 kW system | Includes basic components |
| Wind Turbine | $1,200–$5,000 | 1–3 kW capacity | Tower height affects price |
| Hybrid Charge Controller | $150–$500 | 30–60A capacity | Must handle both inputs |
| Deep Cycle Battery | $150–$400 each | 100Ah capacity | Lithium options cost more upfront |
| Mounting & Tower | $500–$2,000 | Varies by installation | Includes all required hardware |
With your materials in place, it’s time to assess your site.
Site Assessment Guidelines
A proper site assessment is crucial for optimizing your system’s performance. Start by evaluating your property’s solar potential. Tools like a solar pathfinder or the NREL’s PVWatts Calculator can help you determine the best panel placement. Ideally, panels should face south and be tilted at an angle equal to your site’s latitude for maximum efficiency.
For wind energy, use an anemometer to measure average wind speeds or consult local wind maps. Place your turbine in an elevated, open area free from obstructions like buildings or trees that could create turbulence. Wind turbines generally perform best when mounted 20–30 feet above ground level, securely anchored to handle strong gusts.
Don’t forget regulatory compliance. Local zoning laws, building codes, and permit requirements can vary, so check with your municipal building department. Many areas require permits for renewable energy systems, particularly grid-tied setups. On the bright side, some states and utilities offer rebates, tax credits, or net metering programs. The Database of State Incentives for Renewables & Efficiency (DSIRE) is a great resource for finding the latest incentives.
When planning your layout, keep these tips in mind:
- Maintain proper clearances and respect distance requirements from neighboring properties.
- Position electrical components close together to reduce power loss and simplify wiring.
- Install battery banks in well-ventilated, temperature-controlled spaces to extend their lifespan and ensure safety.
For those interested in off-grid living or emergency preparedness, AgentXSurvival offers detailed guides and resources on hybrid energy systems, survival gear, and emergency power solutions.
System Design and Setup
Now that you've completed your preparations, it's time to design a system that fits your energy needs while adhering to electrical standards. This step involves thoughtful planning to ensure all components work together efficiently and safely.
Main System Components
Solar panels are your primary daytime energy source, converting sunlight into DC electricity. Monocrystalline panels offer the highest efficiency but come at a higher price, polycrystalline panels strike a balance between cost and performance, and thin-film panels are the most budget-friendly but require more space.
Your wind turbine steps in when solar production dips, such as at night or during cloudy weather. Residential wind turbines typically range from 400W to 3kW, with prices between $500 and $2,500. For effective performance, most turbines require average wind speeds of at least 10 mph.
The hybrid charge controller is vital for managing inputs from both solar panels and wind turbines. It protects your batteries from overcharging and handles the variable AC output from wind turbines, converting it into regulated DC power for battery storage. Quality hybrid controllers generally cost between $100 and $400.
Your battery bank stores the energy produced, ensuring you have power when neither the sun nor wind is available. Deep-cycle lead-acid batteries are priced between $150 and $300 each and require periodic maintenance, while lithium-ion batteries, costing $500 to $1,200 each, last longer and operate more efficiently.
The inverter converts the stored DC power into standard 120V AC electricity for household use. Pure sine wave inverters, priced between $300 and $1,500, deliver clean, reliable power and are compatible with all appliances, making them the top choice for hybrid systems.
With these components in mind, the next step is determining the system size to meet your energy demands.
Calculating System Size for Your Energy Needs
Start by assessing your daily energy consumption. The average U.S. household uses about 877 kWh per month, or roughly 29 kWh per day, but your actual needs may vary depending on your appliances and lifestyle.
Make a list of all devices in your home, noting their wattage and daily usage hours. Add a 20–30% buffer to account for inefficiencies, inverter losses, and potential future energy needs. For example, if your daily consumption is 20 kWh, plan for a system that generates 24–26 kWh per day.
Divide energy generation between solar and wind based on your location's conditions. If your area gets 5 peak sun hours daily and has average wind speeds of 12 mph, you might allocate 70% of your energy needs (18 kWh) to solar and 30% (8 kWh) to wind, with some overlap for added reliability.
For battery storage, aim for two to three days of autonomy in case of low energy production. Using the 20 kWh daily example, you’d need 60 kWh of storage for three days. At a 48V system voltage, this translates to 1,250 amp-hours of battery capacity.
Once your system size is clear, it’s time to map out how these components will connect.
Wiring Diagrams for Off-Grid and Grid-Tied Systems
The following wiring setups adhere to U.S. electrical standards and detail both off-grid and grid-tied configurations.
Off-grid systems operate independently of the utility grid. In these setups, solar panels and wind turbines feed energy into a hybrid charge controller, which regulates battery charging. The inverter then draws power from the batteries to supply your home with AC electricity.
Follow proper color coding for wiring: red for positive DC connections, black for negative DC, and green for grounding. Use circuit breakers and fuses to protect against overcurrent, and install disconnect switches between components for safe maintenance. For solar panels, connect them in series or parallel to match your system’s voltage, and run DC wiring to the hybrid charge controller. Wind turbines connect through the controller’s wind input, often with a dump load resistor to handle excess energy during high winds. Battery wiring requires heavy-gauge cables - typically 4 AWG or larger - for the high current flow in 48V systems.
Grid-tied systems integrate with utility power using a grid-tie inverter and a bidirectional meter. These systems can sell excess power back to the grid through net metering programs, though most will shut down during outages unless equipped with battery backup and a transfer switch.
Grid-tied hybrid systems require additional safety measures, such as rapid shutdown devices for solar panels and anti-islanding protection to prevent energizing utility lines during outages. Be sure to consult local utility requirements and secure interconnection agreements before connecting to the grid.
For both system types, grounding is essential for safety and compliance. Follow NEC Articles 690 and 694 when installing grounding components. Label disconnects clearly and add warning signs as required by local codes.
In 2022, Instructables user "TechBuilder" documented a DIY hybrid solar-wind system for a residential house. The setup included a 28ft wind turbine tower, a 3kW solar array, a hybrid charge controller, a deep-cycle battery bank, and an inverter. By following U.S. wiring standards with color-coded connections and circuit breakers, the project delivered reliable backup power during outages and reduced utility bills by 40%.
Remember, electrical work often requires permits and inspections. Contact your local building department early in the process to understand the requirements and avoid costly delays. Many areas also mandate licensed electricians for final connections, especially for grid-tied systems.
These steps form the foundation of a reliable hybrid energy system. For further resources and guides on off-grid living and emergency preparedness, check out AgentXSurvival, a hub for hybrid energy systems, survival gear, and emergency power solutions.
Assembly and Installation Steps
Now that your system design is finalized and all components are ready, it’s time to dive into the physical setup. A well-executed installation is key to ensuring your hybrid energy system runs smoothly and reliably, especially for long-term energy independence.
Installing Solar Panels
Start by conducting a detailed site assessment to find the best spot for your solar panels. If you’re installing them on a roof, double-check that the roof structure can handle the added weight. For ground-mounted systems, pick a flat area with good drainage and unobstructed southern exposure.
Use the mounting hardware recommended by the panel manufacturer. For rooftop installations, follow the instructions carefully to avoid compromising the roof’s integrity. Ground-mounted systems may require concrete footings - be sure to adhere to local building codes and allow enough time for the concrete to cure before proceeding.
Place the panels according to your system's design specifications, paying attention to angles and orientation for maximum efficiency. Secure them tightly to the mounting structure, following the torque specifications provided by the manufacturer. Connect the panels in series or parallel, as outlined in your design, using weatherproof connectors and running the wiring through conduit where necessary.
Once the panels are securely mounted, you can move on to setting up the wind turbine to complement your energy system.
Setting Up the Wind Turbine
Foundation Preparation:
Start by pouring a concrete foundation based on the turbine and tower manufacturer’s guidelines. Be sure to embed the specified anchor bolts and allow the concrete to cure fully.
Tower Assembly:
Follow the manufacturer’s instructions to assemble the tower sections. Many residential towers are designed for tilt-up assembly, making installation and future maintenance easier.
Guy Wire Installation:
Install guy wires to stabilize the tower. Place the anchors at a distance of about 1.5 times the height of the tower (e.g., a 30-foot tower will need anchors roughly 45 feet from the base). Use galvanized steel cables with sufficient breaking strength and adjust tension with turnbuckles.
Turbine Mounting and Wiring:
Securely attach the turbine to the tower using the recommended mounting hardware. Safely route the power cable along the tower, adhering to cable management best practices. If your design includes a dump load resistor, install it at the base of the tower.
Tower Raising:
With the help of the right equipment and enough assistance, raise the tower into position. Once upright, adjust and tighten the guy wires, ensuring the tower is perfectly vertical before securing everything in place.
After the turbine is installed, connect its output to your system’s wiring to integrate it with the rest of your setup.
Connecting All Components and Testing Setup
Electrical Connections:
Before starting, ensure all circuit breakers and disconnect switches are turned off. Connect the solar array to the hybrid charge controller according to your wiring diagram. Then, link the wind turbine output to its designated controller input, including the dump load resistor if required.
Battery Bank and Inverter Installation:
Use heavy-gauge wiring to connect the battery bank. Install circuit breakers between the charge controller, battery bank, and inverter, ensuring they are rated for the system’s specifications. Mount the inverter in a well-ventilated area close to the batteries to reduce power loss, and follow the manufacturer’s instructions for both DC and AC connections.
System Testing:
Double-check all wiring connections and polarity using a multimeter before powering up the system. Gradually power it on and measure DC voltages at critical points to confirm they align with the system’s specifications. Monitor the system’s performance over a few days - solar production will peak during midday hours, while wind energy output will vary depending on weather conditions. Keep an eye out for error codes or any signs of loose connections.
For more in-depth information on off-grid energy systems, emergency power solutions, and ways to expand your hybrid setup, visit AgentXSurvival for trusted resources and expert advice.
sbb-itb-1666494
System Operation, Maintenance, and Troubleshooting
Startup and Initial Testing
Before powering up your system, double-check all wiring connections using a multimeter and ensure every circuit breaker and disconnect switch is in the "off" position.
When you’re ready to start, follow the proper sequence: power on the charge controller first, then the inverter, and finally connect your loads. Use your multimeter to measure voltage at key points like the solar panel output, wind turbine output, battery terminals, and inverter input/output connections. Your charge controller display should indicate input from both solar and wind sources, while the inverter should provide a steady 120V AC at 60Hz.
Monitor the system's performance over a 24-hour period. During sunny conditions, confirm solar input readings on the charge controller. When the wind picks up, check that the turbine is spinning smoothly and contributing power. This observation period helps identify wiring mistakes or component issues early on, saving you from bigger headaches later.
Watch for any error codes or alarms during this time. Modern charge controllers and inverters often include diagnostics to flag issues like overvoltage, undervoltage, or ground faults. Address these problems immediately rather than delaying, as they can escalate if ignored. Once the system shows consistent, stable performance, you can transition to routine maintenance.
Regular Maintenance Tasks
Solar Panel Care: Clean your panels every 1–3 months with water and a soft brush. If you live in a dusty or pollen-heavy area, you might need to clean them more often. Neglecting this can reduce panel efficiency by up to 25%. After storms or temperature swings, inspect for loose mounting hardware or surface damage like cracks.
Wind Turbine Maintenance: Check the blades, tower, and fasteners twice a year, or more often after severe weather. Lubricate moving parts as per the manufacturer’s guidelines, usually every six months. If you’re in an area with ice or snow, regularly inspect for ice buildup on the blades, as this can cause imbalances and lower power output.
Battery Health Monitoring: For lead-acid batteries, check voltage and specific gravity monthly. Watch for signs of swelling, leaks, or corrosion around the terminals. Batteries should be stored in a temperature-controlled, well-ventilated area to extend their lifespan, which typically ranges from 5–10 years. A battery monitor is a handy tool to track the state of charge and detect performance issues early.
Electrical System Inspection: Inspect all wiring and connections monthly for corrosion, wear, or damage caused by animals. Tighten loose connections and replace any deteriorated wire nuts or corroded terminals. Make sure grounding connections remain secure, as proper grounding is essential for both safety and system functionality.
Documentation: Keep a written log of inspections, cleanings, and repairs. This record is invaluable for identifying patterns, managing warranties, and ensuring your system runs smoothly over time.
Routine maintenance is crucial for keeping your system reliable and ready for emergencies. If recurring issues arise, refer to the troubleshooting tips below.
Common Problems and Solutions
When problems occur, consult your system’s wiring and installation guide. Most hybrid system issues fall into predictable categories, and a systematic approach can save both time and money.
| Symptom | Possible Cause | Solution |
|---|---|---|
| Low power output | Dirty panels, insufficient wind, battery issues | Clean panels, ensure wind speeds are above 10–12 mph, test battery voltage, and replace if necessary. |
| Controller alarm/error codes | Overvoltage, undervoltage, loose wiring | Check all connections, reset the controller, test battery health, and verify proper grounding. |
| Inverter shutdown | System overload, overheating, ground fault | Reduce connected loads, improve ventilation around the inverter, and check the grounding system. |
| Wind turbine not spinning | Mechanical obstruction, brake engaged, low wind | Inspect for debris or ice, ensure the brake mechanism isn’t engaged, and confirm wind speeds meet the minimum requirements. |
Diagnostic Tips: Start with simple checks before diving into complex diagnostics. For example, a homeowner in the Midwest resolved an inverter shutdown by relocating the unit to a better-ventilated space and adding fans. Always begin with the basics.
Seasonal Adjustments: Winter can bring unique challenges, especially in northern regions. Snow accumulation on panels and ice on turbine blades can drastically reduce efficiency. A homeowner in the Northeast improved winter output by installing panels at steeper angles and adding de-icing equipment for the blades.
Advanced Troubleshooting: For persistent issues, consult detailed guides and resources like those available at AgentXSurvival. These materials are particularly helpful for those in remote areas without easy access to professional repair services.
Always prioritize safety when working with electrical systems. Use insulated tools, wear safety gear like glasses and gloves, and follow National Electrical Code guidelines. It’s also a good idea to post clear emergency shutdown instructions near the system so anyone can safely power it down in an urgent situation.
Additional Resources for Off-Grid Survivalists
AgentXSurvival: Your Go-To Resource for Off-Grid Living
A hybrid energy system is the backbone of true energy independence. AgentXSurvival offers a curated selection of off-grid solutions tailored for blackout preparedness, off-grid living, and long-term survival. Their focus? Practical tools and strategies that work in real-life scenarios - not just flashy marketing gimmicks.
"We are an intel node for preppers and survivalists. Every item, guide, or training listed here has been chosen for its real-world value, not flashy ads or hype." - AgentXSurvival
One standout feature is their EMP & Grid-Down Protection section. Here, you’ll find items like Faraday covers to shield charge controllers, inverters, and other sensitive electronics from electromagnetic pulses. They also offer solar backup solutions and blackout tools to keep your hybrid system running smoothly when conventional infrastructure fails.
For those who prefer a hands-on approach, the Tactical Gear & Tools section is a goldmine. It includes multitools, fire starters, and other must-have equipment - perfect for maintaining your wind turbine or cleaning solar panels in remote locations. Meanwhile, their Survival Guides & Field Manuals provide crucial knowledge on homesteading, bushcraft, and frontier skills, helping you seamlessly integrate your hybrid system into a completely off-grid lifestyle.
These resources are designed to help you take your system to the next level.
Expanding Your Hybrid System
Once your hybrid system is up and running, you might find yourself wanting to scale it further to meet evolving off-grid needs. Fortunately, there are plenty of ways to enhance your setup without starting from scratch.
One intriguing option is The Lost Generator, a thermal power source inspired by Edison’s designs. It uses common materials and operates without electricity, making it perfect for off-grid applications. Pair it with the Aqua Tower, an atmospheric water generator that taps into the power your system produces to deliver a sustainable water supply.
You can also consider upgrading your energy storage. Larger battery banks or supercapacitors can store more energy during peak production times, giving you greater flexibility. Adding backup thermal generators powered by propane or wood provides an extra layer of reliability, ensuring your system keeps running even during maintenance or unexpected outages. Combining solar, wind, and thermal power creates a robust energy ecosystem capable of tackling a variety of challenges.
The secret to successful expansion lies in modular design. Start by adding components that integrate seamlessly with your current setup. Then, gradually increase capacity as your needs grow or your budget allows. This approach not only spreads out costs but also ensures your system remains flexible and ready to adapt over time.
Conclusion
Key Takeaways
Building a DIY hybrid solar and wind system isn’t just about slashing your electricity bills - it’s about taking control of your energy future. This dual-source approach offers the kind of reliability that single-source systems often lack. When the sun isn’t shining, chances are the wind is blowing, and together, they create a more consistent power supply.
The U.S. Department of Energy reports that residential solar panel systems can cut electricity bills by 50-90%. Adding wind power to the mix not only increases these savings but also enhances system reliability. With costs ranging from $1,500 to $10,000 USD, depending on your specific setup, the investment pays off over time, giving you both financial savings and long-term energy independence.
But this system delivers more than just financial benefits - it offers peace of mind. Over 60% of off-grid homeowners in the U.S. opt for hybrid systems because of their dependable performance. These numbers reflect a growing trend among homeowners seeking to secure their energy future in an uncertain world.
The installation process is straightforward when broken into manageable steps. From assessing your site to wiring the final components, every phase builds on the last. Prioritizing safety, proper sizing of components, and regular maintenance ensures your system runs smoothly for years to come.
What’s great about this approach is its flexibility. Start small - install solar panels, a wind turbine, batteries, and a hybrid charge controller. Then, as your energy needs grow, you can expand your system. The modular design ensures you’re not limited to today’s requirements and can adapt to tomorrow’s challenges.
Beyond the practical benefits, you’re joining a growing movement toward energy independence. With rising energy costs and increasingly unreliable power grids, your hybrid system becomes a safeguard against both. Whether you’re bracing for the next blackout or simply aiming to lower your utility bills, this system is built to serve you for decades.
The technology works, the parts are accessible, and now you have the know-how. Your journey to energy independence starts with that first installation.
FAQs
To strike the right balance, begin by assessing your local weather conditions. Look at factors like average sunlight hours and wind speeds throughout the year. Tools such as solar radiation charts and wind resource maps tailored to your area can help you collect precise data.
Seasonal changes are key to consider - if your winters tend to be cloudier but come with stronger winds, it might make sense to lean more on wind energy during those months. Take your energy consumption and resource availability into account to design a system that delivers steady power. Blending solar and wind energy systems often improves reliability, especially for off-grid setups.
Maintaining a hybrid solar and wind system over the long haul requires routine care, including inspections, cleaning, and replacing components when necessary. For instance, keeping solar panels clean ensures they operate at peak efficiency, while regular checks of wind turbine blades can catch signs of wear or damage early. Battery performance also needs to be monitored, as most batteries will require replacement every 5 to 10 years, depending on their type and how often they’re used.
On average, annual maintenance costs make up about 1-3% of the system's original cost. This typically covers servicing inverters and occasional upgrades to maintain top-notch performance. Regular maintenance not only boosts efficiency but also extends the system's overall lifespan.
When installing renewable energy systems, you might need permits or have to adhere to specific regulations based on where you live. These rules can differ significantly between states, cities, or counties. To stay on the right side of the law, reach out to your local building department to get details on zoning laws, inspection requirements, and any restrictions related to renewable energy systems.
It’s also a good idea to contact your utility provider to confirm you’re meeting grid connection requirements or net metering policies. Doing this homework upfront can save you from potential fines or complications later.